How to Create a Winged Eyeliner Look for Mature & Hooded Eyes

If you have hooded eyes, you may have experienced the frustration of creating a winged liner that looks perfect—until you relax your eyes and the wing bends, disappears into the crease, or looks distorted.
I’m going to show you a softer, smoky wing technique that works with your eye shape instead of against it.
The goal isn’t a harsh graphic line, but a lifted, blended look that enhances the natural shape of your eyes.
Tools and Materials:
- Eyelash curler
- Black/dark brown eyeliner
- Small liner brush
- Matching matte eyeshadow
- Small pencil brush
- Deep brown/charcoal eyeshadow
- Fluffy blending brush
- Translucent setting powder
- Neutral matte brown eyeshadow
- Mascara
- Small angled brush
- Small concealer brush
- Foundation
Table of contents
1. Curl Your Lashes
Before applying eyeliner, I always start by curling my lashes. It may seem unrelated, but lifting the lashes helps open up the eyes and makes your natural eye shape easier to see.
If you have downturned eyes or heavily hooded eyes, spend a little extra time curling the outer lashes. This creates a subtle lifting effect at the corners of the eyes.

2. Tightline Instead of Drawing a Thick Line
Next, take a black/dark brown eyeliner and tightline your upper lash line.
Tightlining means placing the liner between the lashes instead of drawing a visible line across the eyelid.
This creates the appearance of fuller, thicker lashes without taking up valuable lid space.

It’s also important to know the difference between tightlining and waterlining.
Tightlining places the liner between the lashes, while waterlining applies liner to the inner wet rim of the eye.
If your eyes water or your eyeliner tends to transfer to your lower lash line, I recommend skipping the waterline and keeping the pigment between your lashes instead.

To help the liner last longer, set it with a matching matte eyeshadow. Using a tiny liner brush, press the shadow into the base of the lashes and lightly sweep upward.
This locks in the pigment without adding extra thickness.

My lashes already look fuller!

3. Create the Wing With Relaxed Eyes
When creating the wing, look straight into the mirror with your eyes completely relaxed.
This is one of the most important steps because you want to design the wing for how your eyes naturally look—not how they look when you stretch the skin or raise your eyebrows.
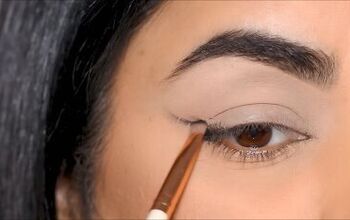
Start by placing a small dot where your upper and lower lash lines meet. Using an angled brush, gently stretch that dot outward.

The key is to go out, not up. If you angle the wing too high, it can disappear into the crease, which is exactly what we are trying to avoid.
Once the first line is where you want it, flip the brush so the pointed end faces outward and connect the wing back into the outer corner of your eye.

If one eye is more hooded than the other, start with the more hooded eye first. Since it has more limitations, it’s easier to match the less hooded eye afterward.

4. Smoke Out the Wing
Softening the wing makes this technique especially flattering for hooded eyes, while a crisp graphic line can emphasize folds.
I use a small pencil brush with a deep shade slightly softer than black, like dark brown or charcoal.
Starting at the outer edge of the wing, gently buff the liner to diffuse the edges, keeping most of the shadow on the outer third of the eye.
This keeps the lifted wing effect while leaving the center of the lid brighter and more open.

5. Prevent Creasing With Powder
If your eyeliner tends to transfer onto your crease throughout the day, try lightly setting the crease area.
Take a small fluffy brush dipped in translucent setting powder and gently buff it through the crease.
This helps absorb excess oil and creates a smoother surface, making it less likely that your liner will stamp onto the crease when you blink.
For more separation between the crease and eyelid, you can sweep a neutral mid-tone brown through the crease with a fluffy blending brush. This adds shape without taking away from the soft wing.
Finish the look with mascara, focusing on lifting the outer lashes.

6. Clean Up and Define the Lower Lash Line
If your wing becomes thicker than you intended or you want a sharper edge, use a tiny concealer brush with a small amount of foundation to clean up the edges.
I prefer foundation over concealer because it's thinner and gives more control while blending naturally into the skin.

The final step is optional, but I love adding definition to the lower lash line. Using the same soft neutral shade from the crease, lightly buff it underneath the lower lashes.
This creates the illusion of larger, more open eyes without making them look darker or heavier.

You can also brighten the inner corner with a matte ivory or soft white eyeshadow to help the eyes look more awake.

Final Thoughts
Once you get the hang of it, this soft smoky wing technique is surprisingly quick and easy.

It creates a polished look that works for everyday wear but is still elegant enough for special occasions.
Our features naturally change over time, and our makeup techniques can change along with them.
Hooded eyes don’t mean you have to give up winged liner. You may just need a technique that works with your eye shape.
The author may collect a small share of sales from the links on this page.













Comments
Join the conversation