Simple Knot Bun Tutorial for a Cute Easy Updo Hairstyle

Trying a new hairstyle can completely change your look, and this cute, easy updo hairstyle makes it simple to create something polished without spending hours in front of the mirror.
Whether your hair is straight, curled, or naturally curly, this updo works for almost anyone and can easily transition from casual daytime plans to special occasions.
Tools and Materials:
- Hair oil
- Hair elastics or hair ties
- Bobby pins or spiral pins
- Texture spray or dry shampoo
- Curling iron (optional)
- Styling cream with edge control wand
1. Prep the Front Section
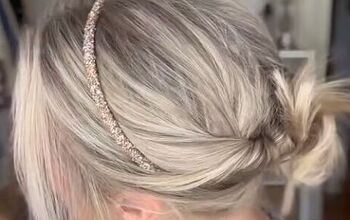
Start by deciding how you want the front of your hair to look. You can slick everything back or leave a few pieces out around your face for a softer style. After choosing your front sections, pull the remaining hair back.

2. Create the Two Ponytails
Using hair elastics or hair ties, secure the top section near the crown of your head. Keep it positioned so the style won’t be too visible from the front.
Flip that ponytail upward and gather the remaining bottom section into a second ponytail directly underneath the first one. Keep the two ponytails close together and smooth the hair back neatly.
Hair hack: If you use small hair elastics, coating them lightly with hair oil can help prevent them from snagging your hair during removal.

3. Use Bobby Pins Correctly
For this style, bobby pins play a major role in keeping everything secure. When inserting them, make sure the ridged side faces downward.

Slightly open the pin, grab a small section of hair, and slide it into place. You can also use spiral pins if you prefer.

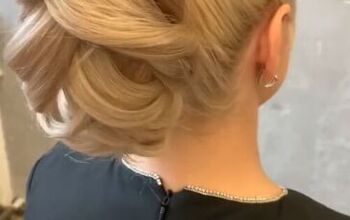
4. Tie the First Knot
Tighten the top ponytail so it sits snugly against your head. Split the ponytail into two sections and tie them into a knot, similar to tying shoelaces.

Once tightened, flip the knot upward toward the top of your head. Before pinning it down, gently loosen the knot slightly to add softness and volume.

Insert bobby pins directly into the knot on both sides to secure it firmly in place. Leave the loose ends hanging for now.

5. Repeat With the Second Ponytail
Take the lower ponytail and repeat the exact same process. Tighten it against your head, split it into two sections, and tie another knot.

Position this second knot close to the first one, then secure it with bobby pins. Make sure you only grab a small amount of hair with each pin so they stay hidden and don’t pop out.
Gently stretch the knot slightly to create a fuller appearance.

6. Tuck or Knot the Ends
If only a few ends are sticking out, tuck them underneath the updo and pin them into place.
For longer hair, combine the loose ends from both knots into two sections and tie another knot.

Continue knotting the hair downward if needed, then tuck the remaining ends underneath the updo and secure them with bobby pins.
You can either leave some flipped-out edges visible for texture or tuck everything away for a sleeker finish.

7. Add Texture and Volume
If your hair feels too silky or slippery, add texture spray or dry shampoo to give it more grip. Clean hair can sometimes make updos harder to hold, so adding texture helps everything stay in place.

Once the structure is secure, gently pinch and pull sections of the hairstyle to soften it and create volume around the crown. Add more bobby pins wherever needed.

8. Finish the Front Pieces
Curl or smooth the front sections of hair depending on the look you want. If any curls feel too tight, lightly run a flat iron through them to soften the shape.

You can also use a styling cream or edge product to smooth flyaways and create a cleaner finish around the hairline.

Pinch and pull at the crown as well for slight volume so the updo doesn't appear flattened to your head.

Final Thoughts:
This cute, easy updo hairstyle works beautifully for summer outings, weddings, brunches etc.

With a few simple knots, some texture, and strategic pinning, you can create an effortless style that looks far more complicated than it actually is.
For more hairstyles to try, check out this bun that will turn heads.
The author may collect a small share of sales from the links on this page.


Comments
Join the conversation
very, very nice!!!