Follow This Easy Tutorial to Create a Glam, Metallic Nail Design

Metallic nail designs are such a fun way to add a bold, edgy touch to your look.
Today, I’m going to show you how to create a silver metallic nail polish design that’s super easy and guaranteed to turn heads.
Follow along, and let’s get started!
Tools and materials:
- Textured press-ons
- Base coat
- Metallic watercolor silver nail polish
- Top coat
- UV light

1. Apply press-on textured nails
To begin, choose a set of press-on textured nails that will serve as the base for this look.
Press-ons are great because they add instant length and give your nails a professional finish.

2. Add a base coat
Apply a thin layer of base coat to each nail. This helps the polish adhere better and protects the nails.

3. Apply metal watercolor nail polish
Now comes the star of the show—the metal watercolor nail polish!
Apply a generous coat of this shimmering silver polish to your nails. Its metallic finish is what gives this design that bold, edgy vibe.

4. Seal with a top coat
To finish, apply a glossy top coat over the metallic silver nail polish to seal the design and enhance the shine.

Once the top coat is on, cure your nails under a UV lamp for 60 seconds to lock everything in place.


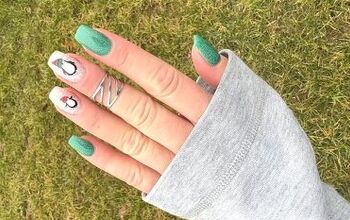
Metallic nail design
And that’s it! In just a few easy steps, I’ve got these amazing silver metallic nails. They’re perfect for a night out or just to add some flair to my everyday look.
What do you think of these silver nails? Let me know in the comments.
Next, learn How to DIY Easy Blue Ombre Nails at Home.
The author may collect a small share of sales from the links on this page.


Comments
Join the conversation