How to Get Perfect Winged Liner Every Time

Winged liner doesn’t have to be stressful. With a little surgical tape and the right placement, you can create sharp, seamless wings in seconds.
Follow along with my step-by-step tutorial to master the perfect winged liner every time!
I’ll walk you through simple adjustments if it doesn’t turn out just right, and I’ll demonstrate the look using both black and brown eyeliner so you can choose between a bold or natural finish.
Tools and materials:
- Surgical tape
- Matte black eyeshadow
- Mirror
- Small flat brush
- Small brush
- Eyelash curler
- Liquid or gel eyeliner
- Eyelash primer
- Mascara
- Medium brown eyeshadow
- Angled brush
- Foundation
- Gel eyeliner
1. Choosing the right tape
This time, I’m using surgical tape instead of scotch tape because it’s softer, more flexible, and gentler on the skin. Scotch tape tends to lock you into a rigid line, while surgical tape allows more control and comfort.

Upstyle Recommends!
Before applying, cut two strips and press each one on the back of your hand to remove excess stickiness so it won’t tug on delicate eye skin.

2. Placing the tape
For placement, imagine a line extending upward from your lower lash line.
Place the tape so it lifts the outer corner of the eye, which is especially helpful if you have hooded eyes. A smaller “baby wing” often avoids folds at the outer edge.

The front of the top piece of tape should be in line with your pupil. Don’t be afraid to lift the tape–you can always lift and reapply if it doesn’t look right.

3. Filling in the wing
The beauty of this trick is that you don’t need brushes! You can simply use your finger if you prefer. Take a matte black eyeshadow and run it over the tape, coloring in the wing shape.
Look down into a mirror to stretch the skin for a smoother finish. Apply a couple of coats if needed, focusing on the outer corner without lifting the tape.

4. Removing the tape
When peeling away the tape, hold your skin taut with one hand and gently pull the tape back on itself to avoid tugging. Remove the top strip first, then the bottom strip.

This will reveal a sharp baby wing.

If you’d like, use a small flat brush to extend or sharpen the wing further.

5. Perfecting the lash line
To make the liner look seamless, take a small brush with a bit of eyeshadow and fill in between the roots of your lashes.
This step prevents any visible gaps of skin. You can also do this before removing the tape for extra precision.

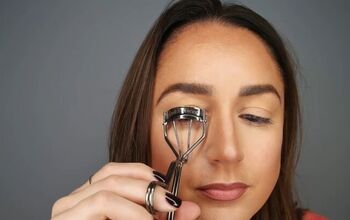
6. Curling the lashes
Curling your eyelashes helps open up the eyes. I like using the Rephr eyelash curler or a smaller one for stubborn or straight lashes.

Here’s what the small lash curler looks like:

If you notice a bit of flesh color beneath the lash line after curling, you can fill it in with a liquid or gel liner for a polished finish.
Use the handle of a thin brush to lift your eyelid to make this easier. If it doesn’t bother you, feel free to skip this part.

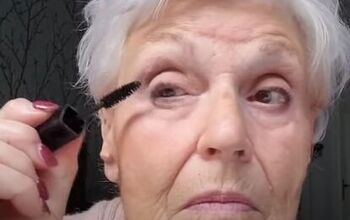
7. Adding primer and mascara
Since I’m not using false eyelashes here, I maximize my natural lashes with an eyelash primer. This thickens them before mascara, making them appear fuller and more dramatic.
My favorite is by Lancome, but any clear-drying primer works.

Then apply your go-to mascara.

8. Creating a softer brown wing
For a more subtle look, try brown eyeshadow. Apply the tape slightly higher at the outer edge to elongate the wing. I’m planning to do this slightly off so that I can show you how to tweak it.

Fill in with a medium brown shadow, keeping the skin taut as you remove the tape.

Blend gently into the lash roots to keep it seamless, and extend the tail for an elongated look.

Curl and prime your lashes like you did with your first eye, before applying mascara.

9. Correcting uneven lines
Sometimes the wing looks straight when you’re looking down but uneven when you look up.

To fix this, use a small angled brush with a touch of foundation. Work it over the uneven area until the line looks smooth and seamless.
This quick step takes only a few seconds but makes all the difference.

10. Adding sultry definition
For extra depth, apply gel eyeliner to the outer half of your lower waterline, tapering it softly toward the center.
You can also coat the upper waterline by blinking onto the brush for a more comfortable application. This adds sultriness without closing the eyes or making them look smaller.

Now you’ve got the perfect wing, whether bold in black or soft in brown! Try this trick for yourself and let me know in the comments which version you’d wear.

How to get perfect winged liner
If you enjoyed this easy winged eyeliner tutorial, leave a comment check out this easy smokey eye makeup look that looks so beautiful in natural light. Bye for now!
The author may collect a small share of sales from the links on this page.


Comments
Join the conversation