Create a Cute Travel Bag With This Easy DIY Sewing Pattern

An extra travel bag for women is useful to bring back those extra items you always end up buying while you're away.
Today, I have a lightweight travel bag sewing pattern for you that you can fold up to fit in your luggage.
It’s made from regular weight cotton and is easy to sew even for beginners.
Tools and materials:
- Plain cotton fabric for outer
- Printed cotton fabric for outer
- Cotton lining fabric
- 27 1/2” (70 cm) single or dual opening zipper
- Fabric marker
- Ruler
- Scissors
- Fabric clips
- Pins
- Iron
- Sewing machine

1. Handles
Cut two pieces of plain fabric, 29 7/8” by 4 3/4” (76 cm by 12 cm).
Fold one in half lengthways with the wrong side inside and finger press the crease.
Open it out and press both long edges to the center line.

Fold in half again and top stitch the long sides.
Repeat for the second handle.
2. Bag top section
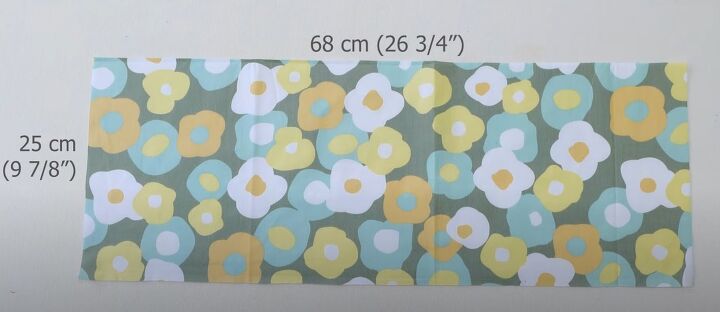
Cut two pieces of printed outer fabric, 26 3/4” by 9 7/8” (68 cm by 25 cm).

Optionally sew your label centrally, 2 3/8” (6 cm) above one long edge.
Draw two lines perpendicular to the lower edge, 3 1/8” (8 cm) either side of the center.
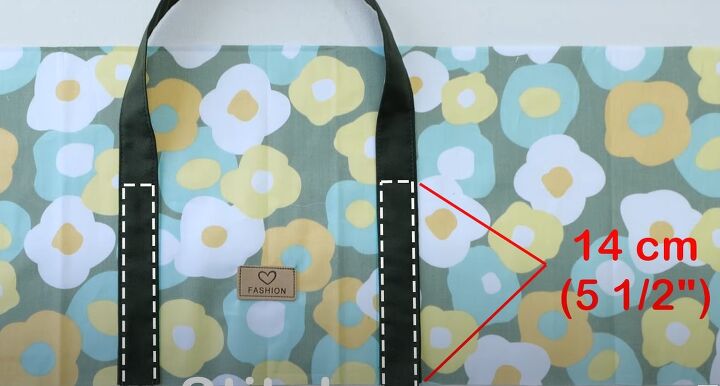
Place the inner edge of the handle against the lines and pin in place, lining up the ends of the handle with the raw edge.
Sew the lower 5 1/2” (14 cm) of the handle in place up each side and across the top.
Repeat to attach the second handle.

3. Bag base
Cut a piece of the plain fabric, 26 3/4” by 19 5/8” (68 cm by 50 cm).
Lay it flat with the right side uppermost and with the longer edges top and bottom.
Place the bag top sections over it with the right sides together and the ends of the handles aligned with the edges of the base.
Sew in place, taking a 3/8” (1 cm) seam allowance.

Open out the panels and top stitch the seams.

4. Inner pocket
Cut a piece of lining 15” by 15 3/4” (38 cm by 40 cm) for the inner pocket.
Fold it in half widthways with the right side inside and sew the raw edges together, leaving a small opening on the long side.
Snip the corners and turn it right side out through the opening.
Top stitch the folded edge and turn in the edges of the opening.
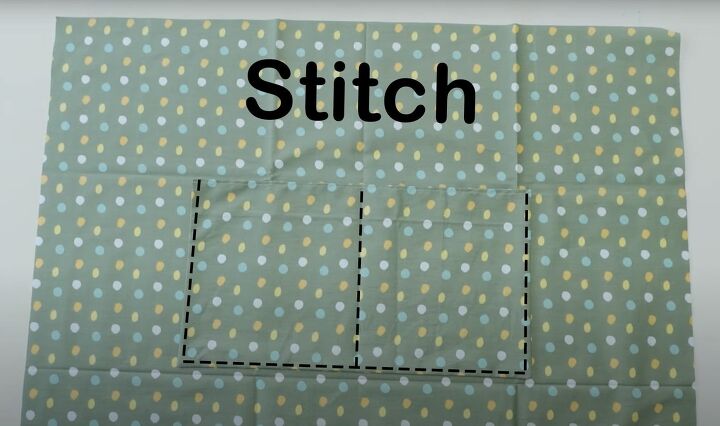
Cut the main lining piece 37 3/4” by 26 3/4” (96 cm by 68 cm).
Place the pocket centrally about 8 inches (20 cm) below one of the shorter sides.
Sew in place around the three sides and up the center line.

5. Insert zipper
Separate the two sections of the zipper by removing the tab.
Lay the lining flat with the right side uppermost.
Place one part of the zipper on each of the shorter sides of the lining, with the tape aligned with the raw edges.

Put the bag section on top, with the wrong side uppermost.
Sew in place with a 1/4” (0.5 cm) seam allowance.

Turn the bag right side out and top stitch both seams.

Trim off any excess zipper tape at both ends.
Bring the zipper teeth together and slide the tab over them.
Slide the tab the length of the zipper to close the teeth, remove it and reattach it at the top.
If you have a dual opening zipper, attach the second tab at the other end of the zipper.

6. Assemble the bag
Fold the bag with the closed zipper at the top and notch the base at each side to mark the center.

Refold with the zipper in the center and clip each end over the notches.
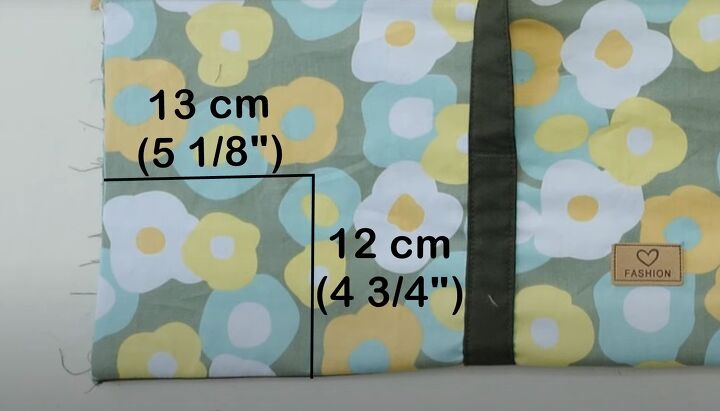
Mark and cut out a 5 1/8” by 4 3/4” (13 cm by 12 cm) rectangle at each corner.

Turn the bag wrong side out.
Clip the layers of the two shorter sections together.

Cut two 2 3/8” (6cm) squares of plain fabric.
Fold two edges towards the center as you did for the handles, and finger press the creases.
Fold in half widthways with the edges on the inside to make a small tab.
Repeat with the second piece.

Place one tab at each end of the zipper, between the base layer and the zipper tape, and replace the base layer.

Sew the two seams.

7. Complete the base
Turn the bag right side out through one of the openings.
Bring the edges of each cut-out together with the two seams in the center.

Sew them together with the wrong sides facing and taking a 1/4” (0.5 cm) seam allowance.
Open the zipper and turn the bag wrong side out.

Make a French seam by stitching the seams again with a 3/8” (1 cm) seam allowance to enclose the raw edges.
Finally turn the bag right side out again.

DIY travel bag
As shown, your DIY travel bag is suitable to carry lightweight clothing items.
To make a stronger bag you could use canvas instead of cotton for the outer bag or insert a piece of cardboard between the lining and the base of the bag.
However, either of these modifications will make the bag more difficult to fold when you’re not using it.
I’d love to know your thoughts in the comments below.
The author may collect a small share of sales from the links on this page.



























Comments
Join the conversation