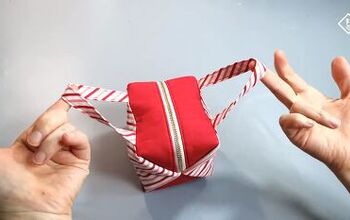
This DIY Mini Tote Bag Is So Cute and Fun To Make

Today’s mini tote bag project includes French seams, a zippered inner pocket and a magnetic closure. The webbing strap handles are a strong design feature.
Advanced beginners will enjoy making this stylish and unique bag.
Tools and materials:
- 12 oz canvas outer
- Cotton lining
- 6 1/4” (16 cm) zipper
- Scrap of fusible interfacing
- Magnetic button closure
- 1 3/8” (3.5 cm) wide webbing strap
- Label (optional)
- Fabric marker
- Ruler
- Pliers
- Iron
- Fabric clips
- Scissors
- Sewing machine

Lining / cotton:
38 x 27 cm (15" x 10 5/8") 1 pc
31 x 16 cm (12 1/4" x 6 1/4") 1 pc
1. Cut out fabric pieces
Cut one piece from the canvas, 19 3/4” by 10 5/8” (50 cm by 27 cm). The main lining is 15 inches by 10 5/8” (38 cm by 27 cm). You will also need to cut a piece of lining 12 1/4” by 6 1/4” (31 cm by 16 cm) for the inner pocket.
Cut two pieces of the 1 3/8” (3.5 cm) wide webbing strap each 18 1/2” (47 cm) long and seal the cut ends with an open flame.

2. Attach the magnetic buttons
Find the center of the short sides of the canvas piece.
With the right side uppermost, mark the position of the button 1 inch (2.5 cm) from one edge.

Mark and cut out the slits using the backing plate as a template.

Push the button through the slits from the right side and place a scrap of interfacing over the prongs to strengthen the closure before adding the backing plate.
Open the prongs outwards with a pair of pliers.

Attach the second part of the button on the other edge in the same way.

If you want to add a label, sew it in place now, 3 inches (7.5 cm) from the short edge.

3. Zippered pocket
Draw a 5/8” by 4 3/4” (1.5 cm by 12 cm) rectangle on the wrong side of the smaller piece of lining, 1 1/8” (3 cm) from one of the short ends and 3/4” (2 cm) from each side edge.

Place the pocket on top of the main lining piece with the right sides together and the upper edge of the pocket 5/8” (1.5 cm) from the edge of the lining.
Sew them together around the sides of the rectangle.

Cut through the center of the rectangle and into each corner.

Push the pocket piece through the opening to the wrong side of the lining.

Turn the lining over and place the zipper behind the opening.
Sew it in place around the edges of the opening.

On the wrong side of the lining, fold the pocket in half with the right side inside and sew together around the three open edges.

4. Attach the lining
Place the canvas piece over the lining with the right sides facing.
Match the two side edges and sew them together.

Turn the bag and lining right side out. Make sure the overlap measures 1 1/8” (3 cm) on each side.
Press the folds, being careful not to iron directly over the magnetic buttons.

5. Side gusset
Draw a line parallel to each of the long sides of the canvas and 1 3/4” (4.5 cm) from them.

Fold the sides to the inside along the lines, and press in place.

Top stitch close to the folds.

6. Attach the straps
Put the bag canvas side up and open out the side pieces.
Fold one handle at each end, 3/4” (2 cm) from the side folds. Place the ends of each strap 5 inches (12.5 cm) from the top edges of the bag.
Stitch securely in place by sewing a square and then across each diagonal.

7. Side seams
Fold the bag in half widthways with the lining on the inside.
Sew the raw edges together with a narrow seam allowance.
Turn the bag wrong side out.

Sew the side seams again from the inside, making sure you enclose the raw edges of the previous seam to create a French seam.

8. Bag base
Fold each bottom corner into a point.

Stitch across the base of each triangle, 1/4” (0.7 cm) outside the seam.
Turn the bag right side out and push out the corners.


DIY mini tote bag
If the zippered pocket and French side seams are new techniques to you, a mini tote bag is the perfect item to practise them on before you work on a larger project.
Once you’ve mastered them, it’s easy to scale them up.
I hope this tutorial was helpful and I’d love to know how you get on. Please drop me a comment below with any thoughts or questions you may have.
Next, learn How to Make a Pretty Storage Bag for Your Crafts.
The author may collect a small share of sales from the links on this page.


Comments
Join the conversation