Glam Spotlight Eye Makeup Tutorial

This spotlight eye makeup is one of the most viewed makeup videos. I’m going to show you how to recreate it step by step. You’ll see how easy it is to do.
Tools and materials:
- Eyebrow pencil and brush
- Concealer
- Concealer brush
- Sponge
- Translucent setting powder
- Powder brush
- Brown eyeshadow palette
- Sponge tip applicator
- Eyeshadow blending brush
- Small flat brush
- Black eyeliner pencil
- Metallic eyeliner pencil
- Eyelash curlers
- Mascara
- False eyelashes
- Lip gloss

1. Brows
I start with my eyebrows. I brush them through first and then use a black pencil to fill in any gaps precisely.

2. Base
I want one skin tone from my brows down to my lash line, so I even the whole area out with concealer.
I brush it on quite thickly and blend it out with a sponge.

To prevent it from settling into fine lines and creases and to absorb any oil on my lids, I set it with a fine loose translucent powder that I apply with a powder brush.

3. Inner and outer corners
I chose a palette in shades of brown for my coloring.
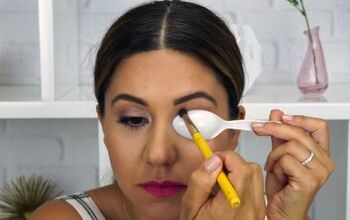
I’m starting with the second darkest shade and I’m using a sponge tipped applicator to apply it.

I’m pressing this into the inner and outer corners of my eyelid and my lower lash line.

Once the color is packed on, I blend it so there are no hard edges and it will flow into the other colors that I’m going to apply later.
I’m using a blending brush that’s soft and fluffy with a rounded top, to make it easier to get that cloud-like appearance.

Then I load a small, flat brush with the darkest shade, which is black in my case, and apply it in the same way as the previous shadow.
I press it into the corners and blend it out carefully, leaving the center of my upper lid clear.
I’m looking for the shadow to be very dark in the corners, blending to lighter shades as it moves upwards and outwards.

4. Transition
To help the darker colors melt into my skin tone, I’m applying the lighter brown shade with the rounded blending brush I used before.

I’m applying this in the inner and outer edges of my lid and below my eyes. It’s a very muted shade that’s slightly darker than my natural skin tone.
I’m blending it just above my upper lid as well and the idea is to buff the other shadows into my skin so there are no harsh transitions at all.

5. Highlight
For the very center of my upper lid, I’m going to use a translucent, pearly eyeshadow.
I’m applying it with my finger tip and pressing it on gently.

Then I use a flat brush to blend it very lightly into the shadows on either side.

I also apply a tiny dab of it under my lashes in the center of my lower lid.
I use a little concealer here first to help it stay in place.

6. Eyeliner and mascara
As the idea is to keep my makeup very dark at each side, I use a black pencil on the waterline in the inner and outer corners of both lids.

I follow this with a metallic eyeliner pencil in the center of my lower waterline.

I always curl my eyelashes before applying mascara and brushing it through carefully from root to tip.
I’m not adding false lashes today, but they work very well with this look.

7. Finishing
I love to apply my lip gloss in the center of my lips and blend it out with my fingers. It gives a very natural look that’s easy to layer or outline for evenings.


Glam spotlight eye makeup look
Here’s the full finished look with a close-up of my eyes.
I like to break these ideas down for you so that they’re easy to follow, but at the same time I want it to look as if you had your makeup done by a professional.
What do you think of this look? Please let me know in the comments below.
The author may collect a small share of sales from the links on this page.














Comments
Join the conversation